Why portable hardness testing? Portable hardness testers have come of age since the late 90’s, with a vast offering of high tech, digital instrumentation. Small, compact and menu driven, these instruments have never been easier to use for unlimited types of applications.
There are two basic methods of portable hardness testing that is accepted in the field today.
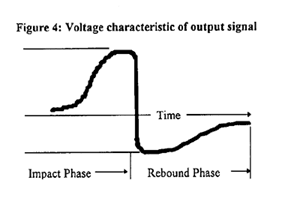
“Dynamic Impact” is based on the Leeb principle of hardness,developed by Dietmar Leeb in the 1970’s. A spring loaded impact body is thrust to the test surface, effecting rebound. The speed of both the initial thrust and the rebound is measured in a non-contact mode. This is calculated as a Leeb hardness value and then automatically converted to Rockwell C, B, Brinell, Vickers and Shore Values. It has effectually brought easy, fast and accurate results to portable hardness testing.

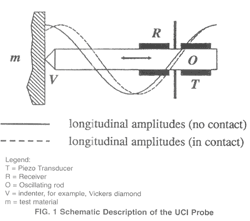
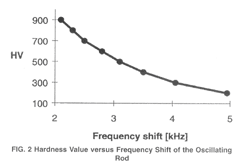
“Ultrasonic Contact Impedance” is based on a 136 degree diamond at the end of a vibrating rod being depressed into the test surface at a fixed load. The difference in Ultrasonic vibration frequency is then calculated into a hardness value. The UCI test procedure is slower than the Dynamic Impact style, however the “UCI” method of hardness testing is portable, easy and accurate. It also has its own advantages when utilized for certain testing applications. UCI testers are not restricted to large mass items like dynamic type testers. These units can test metals as thin as 1mm and at a hardness value as low as 20HRC (75HB). They also excel at performing hardness tests on larger, harder metals as well. Another reason for the rise in popularity is due to the fact that the UCI method is categorized as “Non-Destructive”. That translates into less scrap parts/ lower mfg costs due to necessary inspections.


Technical Data for Dynamic Impact Devices
| Impact Devices → | D/DC/DL | D+15 | C | G |
| Impact energy | 11Nmm | 11Nmm | 3Nmm | 90Nmm |
| Mass of the impact body | 5. 5g | 7. 8g | 3. 0g | 20g |
| DL: 7.3g | ||||
| Test tip | ||||
| * Hardness | 1600HV | 1600HV | 1600HV | 1600HV |
| * Diameter | 3mm | 3mm | 3mm | 5mm |
| * Material | Tungsten | Tungsten | ||
| * | carbide | carbide | ||
| Impact device | ||||
| * Diameter | 20mm | 20mm | 20mm | 30mm |
| * Length | 147/86mm | 162mm | 141mm | 254mm |
| * Weight | 75/50g | 80g | 75g | 250g |
| Max. hardness of sample | 940HV | 940HV | 1000HV | 650HB |
| Preparation of surface | ||||
| * Roughness class ISO | N7 | N7 | N5 | N9 |
| * Max. roughness depth Rt | 10 µ m | 10 µ m | 2.5 µ m | 30 µ m |
| * Average roughness Ra | 2 µ m | 2 µ m | 0. 4 µ m | 7 µ m |
| Min. weight of sample | ||||
| * Of compact shape | 5kg | 5kg | 1.5kg | 15kg |
| * On solid support | 2kg | 2kg | 0.5kg | 5kg |
| * Coupled on plate | 0. 1kg | 0. 1kg | 0. 02kg | 0. 5kg |
| Min. thickness of sample | ||||
| * Coupled | 3mm | 3mm | 1mm | 10mm |
| * Min. thickness of layers | 0. 8mm | 0. 8mm | 0. 2mm | - |
| Indentation of test tip | ||||
| With 300 HV | ||||
| * Diameter | 0. 54mm | 0. 54mm | 0. 38mm | 1.03mm |
| * Depth | 24 µ m | 24 µ m | 12 µ m | 53 µ m |
| with 600 HV | ||||
| * Diameter | 0. 45mm | 0. 45mm | 0. 32mm | 0. 90mm |
| * Depth | 17 µ m | 17 µ m | 8 µ m | 41 µ mC |
| with 800 HV | ||||
| * Diameter | 0. 35mm | 0. 35mm | 0. 30mm | - |
| * Depth | 10 µ m | 10 µ m | 7 µ m | - |
Technical Data for UCI Hardness Tester
| Test Device |
U1 |
| Length | 160mm |
| Diameter | 25mm |
| Indentation Depth | 30µm |
| Pressure Force | 14.7N |
| Transducer Test Life (approx) | 200,000 |
| Min. Thickness for test | 1mm |
| Min. Radius for Test | 5mm |
| Max Roughness of surface | Ra 2.5µm |
| Max Archive | 100 Tests |
| Time of Test | 4 sec. |
Comparison of Hardness Testing Methods- Phase II Models shown below
| Data | Dynamic | Ultrasonic | Rockwell |
| Requirements | |||
| Surface Finish | Smooth | Smooth | Smooth-Semi Rough |
| Rigid Support of Sample | Yes | Yes | Yes |
| Test sample portability | Not required | Not required | Required |
| Procedures | |||
| Structural Steel | Functional | Functional | Functional |
| Heat Treated Steel | Functional | Functional | Functional (HRC) |
| Case Hardened Material | Functional | Functional | Functional (HRC) |
| Non-Ferrous Metals | Functional | Functional | Functional (HRB) |
| Large Samples | Yes | Yes | Restricted |
| Small Samples | Restricted | Yes | Yes (w/proper scales) |
| Thin Samples | Restricted | Yes | Restricted |
| Curved/Round Surfaces | Yes | Yes | Restricted |
| Special Features | |||
| Automatic Test Procedure | Yes | Yes | Yes |
| Direct Hardness Value | Yes | Yes | Yes |
| Required Time for Avg/5 Tests | Approx. 10 Sec. | Approx. 20 Sec. | Approx. 2 Minutes |
| Digital Display | Yes | Yes | Some Models |
| Scale Conversions | Yes | Yes | Some Models |
| Directional Testing | Yes | Yes | No |
| Standardized by: | ASTM | ASTM | NIST (HRC scale only) |
| Indentation Depth | 20µm | 30µm | 160µm |
| Operator Requirements | |||
| Skills Required | Minimal | Minimal | Minimal |
| Possible Reading Error | None | None | None |
| Instrument Features | |||
| Portability | Yes | Yes | No |
| Power Supply | Battery | Battery | Manual/110v |
| Output to PC | Yes | Yes | Some Models |
